이전에 관련 글을 정리했었는데, 다시 구현하면서 보니 조금 이해가 안되는 부분이 중간 중간에 있어서 흐름 위주로 다시 글을 정리해보았다.
이전 글
Unreal Engine - Main Menu UI (Start, Restart)
1. 디자이너 탭 구성아래와 같은 계층구조로 구성 2. Menu 전용 맵게임이 시작하면 Menu Level에서 위에서 만든 UI가 실행된 후 Start 버튼을 누르면 게임이 시작되는 로직으로 제작할 것이다.새로
gbleem.tistory.com
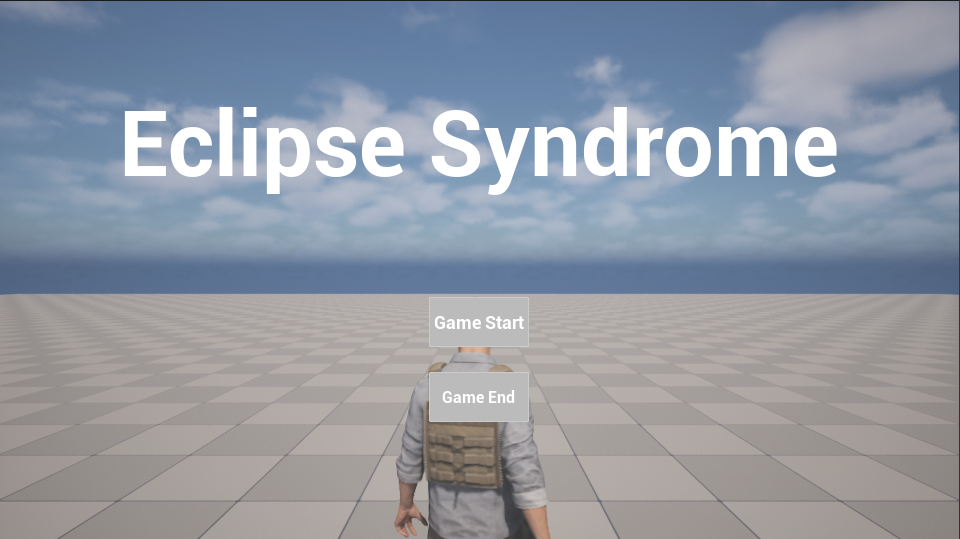
1. 메뉴용 맵과 WBP
메뉴의 바탕이 될 레벨을 하나 만들고
위젯 BP를 만들어서 게임 시작 버튼을 만들면 된다.
이후 Default 레벨을 해당 레벨로 지정하면 된다.
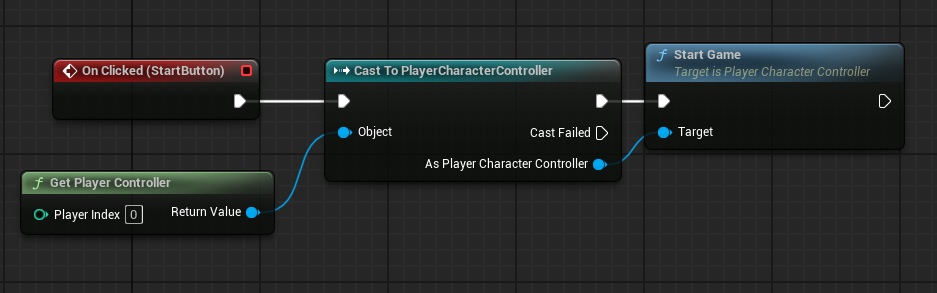
1. UI 만들기 및 띄우기
UI관련 로직은 주로 Player Controller에서 이루어지기 때문에, Player Controller의 BeginPlay에서 Menu UI를 보여주는 함수를 실행하면 된다.
이때 위에서 default 레벨로 지정한 레벨의 이름을 체크후 ShowMainMenu 함수를 실행하면 된다.
void APlayerCharacterController::BeginPlay()
{
	Super::BeginPlay();

	...

	FString CurrentMapName = GetWorld()->GetMapName();
	if (CurrentMapName.Contains("MainMenuLevel"))
	{
		ShowMainMenu();
	}
}
ShowMainMenu 함수는 이전에 구현한 ShowHUD 함수와 같은 동작을 하는데 기존에 있던 UI를 remove하고, 현재 UI Instance를 AddToViewport를 해주면 된다.
void APlayerCharacterController::ShowMainMenu()
{
	if (HUDWidgetInstance)
	{
		HUDWidgetInstance->RemoveFromParent();
		HUDWidgetInstance = nullptr;
	}
	if (MainMenuInstance)
	{
		MainMenuInstance->RemoveFromParent();
		MainMenuInstance = nullptr;
	}

	if (MainMenuClass)
	{
		MainMenuInstance = CreateWidget<UUserWidget>(this, MainMenuClass);

		if (MainMenuInstance)
		{
			MainMenuInstance->AddToViewport();

			bShowMouseCursor = true;
			SetInputMode(FInputModeUIOnly());
		}
	}
}
2. 버튼과 연결
위에서 설명한 내용까지 구현하면 게임 시작 시 UI가 뜨게 되고 Start 버튼을 눌러서 게임을 시작해야 한다.
버튼은 변수여부를 체크 후 아래와 같이 PlayerController에 존재하는 함수와 연결해주면 된다.
StartGame 함수는 아래와 같이 구현했다.
- 신경써야 할 부분은 game instance를 통해서 게임이 다시 초기화해야 하는 값들을 초기화 해주어야 한다. (체력이나 초기 인벤토리 등)
- Game Instance의 변수들은 게임을 종료할 때 까지 안사라지기 때문에 초기화가 필요하다
- 아래의 InitializeInstance 함수를 통해 초기화 해주었다.
- 이후 GameState의 UpdateHUD 함수를 실행해서 초기화된 변수들을 HUD 에 업데이트 해주면 된다.
- 필수적인 코드는 아님
- 마지막으로 OpenLevel을 통해 맨 처음으로 시작할 레벨을 지정해주면 된다.
void APlayerCharacterController::StartGame()
{
	if (UDefaultGameInstance* DefaultGameInstance = Cast<UDefaultGameInstance>(UGameplayStatics::GetGameInstance(this)))
	{
		DefaultGameInstance->InitializeInstance();
	}

	ADefaultGameState* DefaultGameState = Cast<ADefaultGameState>(GetWorld()->GetGameState());
	if (DefaultGameState)
	{
		DefaultGameState->UpdateHUD();
	}

	UGameplayStatics::OpenLevel(GetWorld(), FName("Lv1"));
	SetPause(false);
}
void UDefaultGameInstance::InitializeInstance()
{
InventoryAmmo = 100;
PlayerMaxHealth = 100;
PlayerCurrentHealth = 100;
CurrentLevel = 0;
SpecialSlotItemID = -1;
InventoryItem.Add(1, 0);
InventoryItem.Add(2, InventoryAmmo);
InventoryItem.Add(3, 0);
WeaponInventoryItem.Empty();
}
3. 게임 시작
위에서 설명한 내용까지 구현하면 게임이 시작하게 된다.
게임이 시작하면 GameState의 BeginPlay에서 StartLevel 함수를 실행하게 된다.
void ADefaultGameState::BeginPlay()
{
	Super::BeginPlay();

	UpdateHUD();
	StartLevel();

	GetWorldTimerManager().SetTimer
	(
		HUDUpdateTimerHandle
		, this
		, &ADefaultGameState::UpdateHUD
		, 0.1f
		, true
	);
}
StartLevel 함수는 아래와 같다.
- 여기서는 HUD를 켜주는 함수는 ShowHUD를 실행하고,
- ShowHUD 함수에서는 기존에 있던 UI를 remove하고
- HUD UI를 AddToViewPort 해준다.
- 추가적으로 레벨이 여러개 이므로 GameState의 CurrentLevelIndex 변수랑 GameInstance의 CurrentLevel 변수를 맞춰주면 된다.
void ADefaultGameState::StartLevel()
{
	if (APlayerController* PlayerController = GetWorld()->GetFirstPlayerController())
	{
		if (APlayerCharacterController* PlayerCharacterController = Cast<APlayerCharacterController>(PlayerController))
		{
			if (PlayerCharacterController)
			{
				PlayerCharacterController->ShowHUD();
			}
		}
	}
	if (UGameInstance* GameInstance = GetGameInstance())
	{
		UDefaultGameInstance* DefaultGameInstance = Cast<UDefaultGameInstance>(GameInstance);

		if (DefaultGameInstance)
		{
			CurrentLevelIndex = DefaultGameInstance->CurrentLevel;
		}
	}
	UpdateHUD();
}
4. 추가 처리
다음 레벨로 넘어가는 로직을 위해 아래와 같이 코드를 작성해 주었다.
- 이 과정에서 게임 오버나 게임 클리어 로직을 구성하면 된다.
void ADefaultGameState::LevelChange()
{
	if (GetGameInstance())
	{
		UDefaultGameInstance* DefaultGameInstance = Cast<UDefaultGameInstance>(GetGameInstance());
		if (DefaultGameInstance)
		{
			DefaultGameInstance->CurrentLevel++;
			CurrentLevelIndex = DefaultGameInstance->CurrentLevel;
		}
	}

	if (CurrentLevelIndex >= MaxLevelIndex)
	{
		GameClear();
		return;
	}

	if (LevelMapNames.IsValidIndex(CurrentLevelIndex))
	{
		UGameplayStatics::OpenLevel(GetWorld(), LevelMapNames[CurrentLevelIndex]);
	}
	else
	{
		GameClear();
	}
}
위에서 말한 게임 종료나 클리어될 때 사용할 함수를 만들어두고, 실제 구현은 PlayerController 에서 한 다음 GameState에서 call해주면 된다.
void ADefaultGameState::GameClear()
{
	if (APlayerController* PlayerController = GetWorld()->GetFirstPlayerController())
	{
		if (APlayerCharacterController* PlayerCharacterController = Cast<APlayerCharacterController>(PlayerController))
		{
			PlayerCharacterController->ShowGameClearUI();
		}
	}
}

void ADefaultGameState::GameOver()
{
	if (APlayerController* PlayerController = GetWorld()->GetFirstPlayerController())
	{
		if (APlayerCharacterController* PlayerCharacterController = Cast<APlayerCharacterController>(PlayerController))
		{
			PlayerCharacterController->ShowGameOverUI();
		}
	}
}
참고) ShowGameOverUI 함수는 아래와 같이 구성하였다.
- 게임 종료시 애니메이션을 실행하기 위해 ProcessEvent 함수를 사용하였다.
void APlayerCharacterController::ShowGameOverUI()
{
	if (HUDWidgetInstance)
	{
		HUDWidgetInstance->RemoveFromParent();
		HUDWidgetInstance = nullptr;
	}
	if (MainMenuInstance)
	{
		MainMenuInstance->RemoveFromParent();
		MainMenuInstance = nullptr;
	}

	if (GameOverUIClass)
	{
		GameOverUIInstance = CreateWidget<UUserWidget>(this, GameOverUIClass);

		GameOverUIInstance->AddToViewport();
		bShowMouseCursor = true;
		SetInputMode(FInputModeUIOnly());

		UFunction* GameOverUIAnim = GameOverUIInstance->FindFunction(FName("GameOverAnim"));
		if (GameOverUIAnim)
		{
			GameOverUIInstance->ProcessEvent(GameOverUIAnim, nullptr);
		}
		SetPause(true);
	}
}
영상
- 레벨이 넘어갈때는 현재 아이템이 유지되고,
- 게임 오버 후 다시 시작하면 모든 아이템을 초기화 시켜준다.
'Unreal Engine' 카테고리의 다른 글
| Unreal Engine - UObject (0) | 2025.03.24 |
|---|---|
| Unreal Engine - 채팅 (리슨 서버) (0) | 2025.03.14 |
| UE5 Issues : ADS (Aim Offset 1D) (0) | 2025.03.05 |
| Unreal Engine - Sound play & Effect spawn (0) | 2025.03.05 |
| Unreal Engine - 애님 몽타주 (0) | 2025.03.05 |